To XML install or not to XML install
For as long as I know, I have used PowerShell to install Internet Information System (IIS). The method of which I use PowerShell to install the features have changed, but its still PowerShell.
Originally I was given an XML file that was generated, and I would use that to install the features, but once my scripting skills advanced I learned that there were other ways to do it. Having to relay on an XML file to be available everywhere wasn’t very dependable.
One PowerShell Script to Install Them All
Using a PowerShell script to install IIS features ensures that all installs are the same. This can and will help with troubleshooting later down the road. The best feature of this script is that it changes the default IIS logging directory to the secondary drive. This helps to prevent production outages due to drive filling up with IIS logs that never get cleared.
I’ll take an IIS Install with the Works
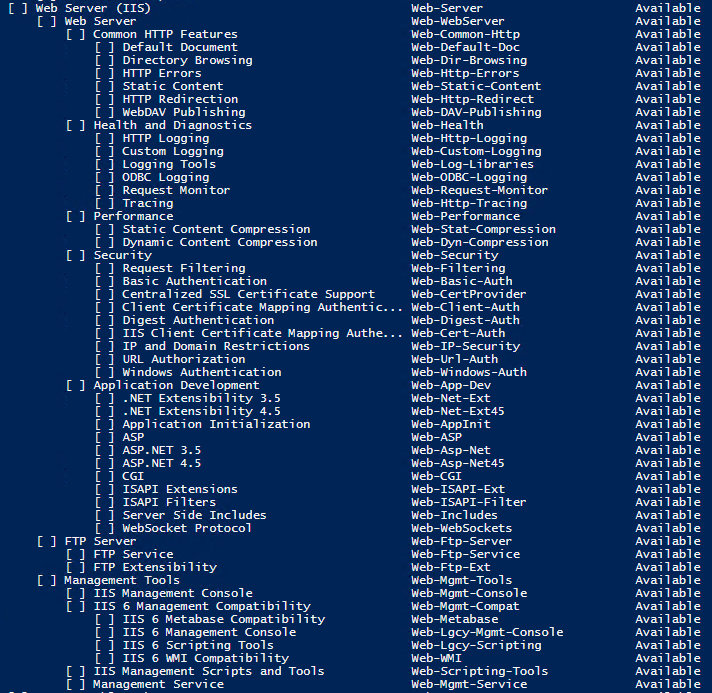
In order to get the features that you want to install with PowerShell you can run the following command:
Get-WindowsFeature *Web*
This output the following to the screen.

Now its a matter of selecting the ones that you want then putting them into a script as follows.
$IISFeatures = "Web-WebServer","Web-Common-Http","Web-Default-Doc","Web-Dir-Browsing","Web-Http-Errors","Web-Static-Content","Web-Http-Redirect","Web-Health","Web-Http-Logging","Web-Custom-Logging","Web-Log-Libraries","Web-ODBC-Logging","Web-Request-Monitor","Web-Http-Tracing","Web-Performance","Web-Stat-Compression","Web-Security","Web-Filtering","Web-Basic-Auth","Web-Client-Auth","Web-Digest-Auth","Web-Cert-Auth","Web-IP-Security","Web-Windows-Auth","Web-App-Dev","Web-Net-Ext","Web-Net-Ext45","Web-Asp-Net","Web-Asp-Net45","Web-ISAPI-Ext","Web-ISAPI-Filter","Web-Mgmt-Tools","Web-Mgmt-Console"
Install-WindowsFeature -Name $IISFeatures

Remove-Website -Name "Default Web Site"
$defaultAppPools = @(".NET v2.0",".NET v2.0 Classic",".NET v4.5",".NET v4.5 Classic","Classic .NET AppPool","DefaultAppPool")
Foreach ($defaultAppPool in $defaultAppPools){
    IF (Test-path "IIS:\AppPools\$defaultAppPool"){Remove-WebAppPool -name $DefaultAppPool}
}

$NewFolders = "inetpub", "inetpub\apps", "logs"
$NewFolders | ForEach-Object {New-Item E:\$_ -type directory}

Import-Module WebAdministration
Set-WebConfigurationProperty "/system.applicationHost/sites/siteDefaults" -name logfile.directory -value E:\logs
After the script completes the IIS features will be installed the default application pools are removed, the default website is deleted, and the default log directory has been changed to the E: drive.
-Stuart

Thank you so much, this is exactly what I was looking for. Sending you a virtual hug!
Thanks Kristin! Glad to be able to help.
-Stuart
This is great! your post helped a lot today… thanks a bunch!!